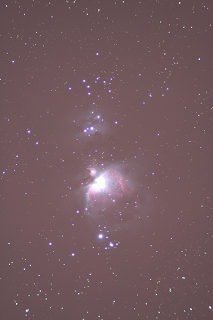
The Sword of Orion is one of the most difficult deep space objects to process that I know. The problem is that some portions of the nebulae are very bright, while others are very dim. Bringing out the detail in the fainter portions overexposes the brighter areas, and toning down the brightness to reveal the detail in the brighter areas hides the darker ones. In photography, such an image is said to have a high
dynamic range.
High dynamic range (HDR) photography is an
art in itself. There are many
tools and
techniques for processing HDR images. This article lists the steps that I follow for processing some HDR astroimages in
GIMP.
Here is the short version of the process:
- Take groups of images at different shutter speeds (e.g., groups of 1-second, 5-second, and 10-second exposures).
- Stack each group of images to create "master" images that represent each shutter speed. (For example, stack all of the 1-second exposures together to create a master 1-second image.)
- Load the individual master images as layers into a single image in GIMP, with the shortest exposure time at the bottom, progressing to the longest at the top.
- Align the layers using the stars on each image.
- Select overexposed areas in each layer, feather the selection, invert it, and then create a layer mask to bring out detail from the lower layers.
- Flatten the image.
The only difficult part of the process is in deciding on the shutter speeds. Experiment with different exposure times and choose those that overlap without losing image detail. My suggestion is to use more exposure times than you will probably need. It is better to have groups of images that you end up discarding than to have too great a gap in the dynamic range for the process to work.
Below are copies of the master images that I used for the Sword of Orion. You may use them to experiment with. The original images are very large files, so these have been reduced to save space and bandwidth. All images were taken at ISO-1600 on my Canon EOS Rebel XS DSLR using the Orion ShortTube 80.
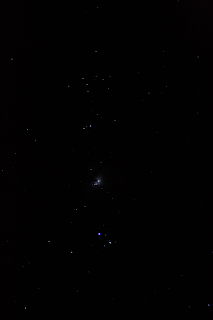 |
| 1 second |
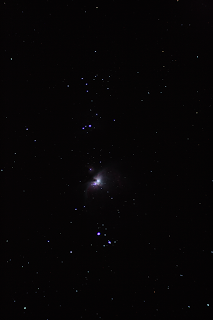 |
| 5 seconds |
 |
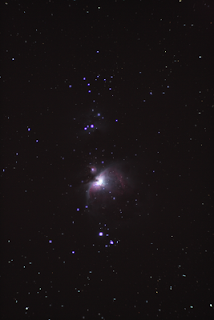
| 10 seconds |
 |
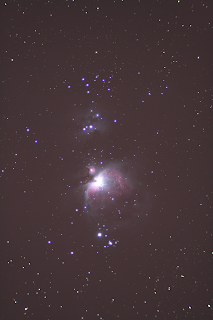
| 20 seconds |
 |
| 60 seconds |
 |
| 120 seconds |
Note how the brighter areas become progressively more washed out as the exposure times increase.
I selected these shutter speeds based on trial and error. My mount does not have the ability to autoguide, so the longest exposure time I can usually hope for is around 3 minutes. A 3-minute test exposure did not reveal any more detail than the 2-minute exposures, so I chose 2 minutes as my maximum. Your mileage may vary...
Each master image must be aligned with the others. This can sometimes be done with a plug-in, such as the alignment "filter" in Georg Hennig's
Gimp Astronomy Plugins. I have had only limited success with this, though, so I prefer to align images manually.
To manually align the images, load the shortest exposure into GIMP, and then load each successively longer exposure as a layer. The image with the longest exposure time should be the top layer. Starting with the top layer:
1. Set the layer opacity to about 50% to allow the layer below to show through a bit.
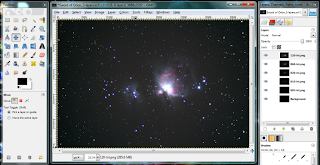 |
| Load all master images as layers in a single image. |
2. Select the layer below from the Layers palette and use the Move Tool to move the selected layer to line up the stars. You can use the keyboard arrows to move pixel-by-pixel, if needed.
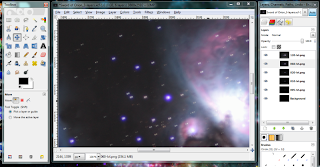 |
| Use the Move Tool to line up the stars. |
3. When the two layers are lined up, set the opacity of the upper layer back to 100%, and then click the visibility icon (the "eye") on the Layers palette to hide that layer.
4. Repeat steps 1 through 3 for the next layer, and continue until all layers are aligned.
Next, create layer masks to bring details from the lower layers up through the overexposed sections of the upper layers:
1. Turn on the visibility for all layers and select the top layer.
2. Select the Fuzzy Select Tool from the Toolbox, and then set the Fuzzy Select Mode to
Add to the current selection.
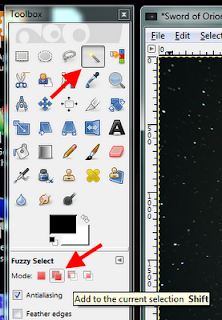 |
| Fuzzy Select Tool and Fuzzy Select Mode. |
3. Select the overexposed areas. The Threshold may be set in the Toolbox to allow the tool to select larger or smaller areas.
 |
| Select the overexposed areas on the selected layer. |
4. Select
Feather... from the
Select menu, and set the feathered area to a large value. For my image (the full-size version) I selected 120 pixels. The exact value will depend on the size of your image and the size of the overexposed areas. In general, the shorter the shutter speed the smaller the area that needs to be feathered. Experiment with different values to see what works best for you.
5. Select
Invert from the
Select menu.
6. From the
Layer menu, select
Mask and then
Add Layer Mask... Click
Selection from the
Initialize Layer Mask to list, and then click
Add. Part of the layer beneath will show through into the selected layer. The feathering from step 4 creates a gradual transition between the images. If the transition appears unnatural, then undo everything back to step 4 and try a different feather value.
 |
| First layer mask on feathered selection. |
7. Select
None from the
Select menu to clear the selected area.
8. Turn off the visibility on the current layer, then repeat steps 3 through 8 for the next layer. Continue until all layers have been processed. No processing is needed for the lowest (background) layer.
 |
| All layer masks created. |
9. Once you are satisfied with the image, select
Flatten Image from the
Image menu to combine all of the layers into a single layer.
I do most of the rest of my image processing after merging the layers. Experiment with different processing sequences to determine whether some steps are better performed before or after merging.
This is by no means the only way to process HDR astroimages. I have found, however, that it is easy to do and produces good results; and, you can't beat the price of GIMP!


