Showing posts with label equipment. Show all posts

Saturday, December 9, 2017

First Light - AT72EDII

Wow! This little scope is a major step up from the ST80.

There is a lot that I want to cover in this post, so bear with me, please. If you're just here for the pictures, then skip down a bit.

The AT72EDII is an air-spaced doublet refractor with an FPL-53 element. The lenses are made by Ohara. The FPL-53 lens makes a huge difference in correcting chromatic aberration, rendering sharper images with much more realistic colors--closer in hue to those that I have gotten from the Epsilon-200. In comparison, I thought the colors I was getting from the ST80 were somewhat "cartoonish," even with the Baader Contrast Booster.

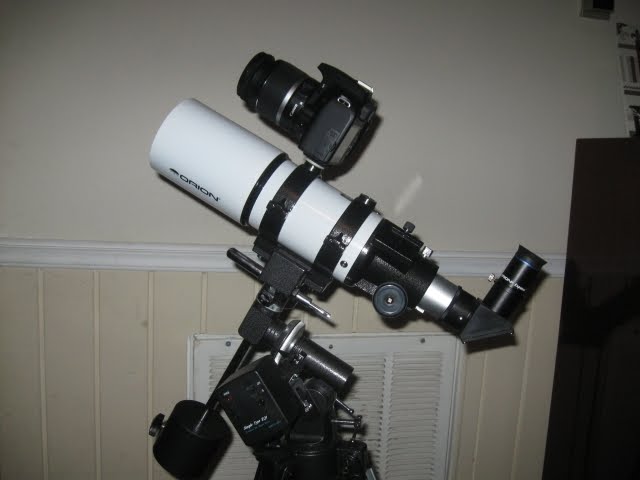
Here is the rig as it was on the night of first light. Using a little of my redneck engineering skills, I cobbled together a viewfinder mount out of plywood and plastic.


A new telescope calls for a new focusing mask, right?  Using the astrojargon Bahtinov Focusing Mask Generator, I printed the mask on card stock, then mounted it to a cap made of more card stock, peel-and-stick foam, and duct tape. It fits over the end of the dew shield.

Yes, I used duct tape.
So, after getting everything put together, the mount aligned, and the focusing mask in place, I pointed the scope at Deneb to set the focus. There wasn't a lot of interest to see during the focusing process, but when I took a 30 second exposure with the mask still on, I got this:

Diffraction spikes on Deneb. Aside from being reduced in size, this is an unprocessed image.
Note the lack of spurious color as compared to these images from the ST80:


I knew that I was in for a treat! So, I took off the mask and made a single, 30-second exposure of Deneb:

Unprocessed, resized image.
Yes, there is a bit of a halo around Deneb, at center, but it is far less prominent (and less purple) than similar images that I've taken with the ST80.

I wanted to image the Double Cluster in Perseus, first, but it wasn't in a good position for the mount when I started. So, I decided to grab a few images of Messier 45, the Pleiades, until the Double Cluster was a little higher in the sky.

Messier 45, the Pleiades
Click here for full size

Exposure: 10x180@ISO1600
Telescope: AT72EDII
FF/Reducer:  ATR8 (f/4.8)
Mount: Vixen Super Polaris
Camera: Canon EOS Rebel T3
Processing: Deep Sky Stacker, Photoshop CS6

This is a close-up (full-size) of a portion of the nebula:

Click here for full size

I admit that, at a quick glance, there isn't a lot of difference between this image and what I think is my best image of the Pleiades made with the ST80. A close look, though, will reveal that the new image has more detail and better color balance. In addition, it took A LOT of processing work to make the older image look like that--there were a lot of problems that had to be dealt with. Frankly, I wouldn't have posted a close-up of the older image. It just didn't look this good at full size!

The Double Cluster finally got high enough to image, but the Moon was only about an hour away from rising. Working quickly, I settled on a relatively short exposure time. Very little processing was required for this image:

NGC 869 (left) and NGC 884
Click here for full size

Exposure: 20x90@ISO1600
Telescope: AT72EDII
FF/Reducer:  ATR8 (f/4.8)
Mount: Vixen Super Polaris
Camera: Canon EOS Rebel T3
Processing: Deep Sky Stacker, Photoshop CS6

Cluster NGC 869 contains an asterism that I call Perseus Man. Some call it The Cowboy.


Now, for the negatives.

The scope is difficult to balance on the declination axis on the Vixen Super Polaris. Judging by the subs that I got, this is probably not a big issue. After all, the mount only has a right ascension motor, and I'm not autoguiding.

The only troubling issue has to do with the ATR8 field flattener/focal reducer. It was advertised as providing "images that are sharply focused out to the very corners of a large format DSLR chip." Although much better than the ST80 (with no flattener), the images still have distorted stars out toward the edges, as seen in this full-size clip from the Deneb image, above:


I'm not certain of the cause. I wonder if I didn't install the T-ring correctly. It's also possible that the flattener doesn't perform quite as advertised. I will do some investigation and testing.

Other than that, I am very pleased with the results. With the winter constellations coming up, there are a lot of targets to image. So what's next? Sword of Orion? Horsehead and Flame? Monkey Head? M35? Dare I try the Flaming Star or the Christmas Tree? I think a return to the X Bar Ranch is in order.

Wednesday, December 6, 2017

The New Scope is Here!

That was amazingly fast! Free ground shipping via FedEx from Astronomics in Oklahoma, and the scope was outside my door in Texas the next day!

Below are some preview pics:


The scope features a metal dust cap (not shown) and machined tube rings attached to a dovetail bar. Note the nifty dust cover over the dual-speed focuser control.


The image above shows the ATR8 focal reducer/field flattener installed. The compression ring on the focuser tube holds it in place very nicely. My Canon T-ring adapter (not shown) attaches to the back of the ATR8 via an included adapter.


The anti-reflective coatings on the lenses appear to be doing their job. There is very little reflection visible compared to the ST80.

Overall, it's a very solid-feeling scope. The focuser is very smooth, and I didn't detect any flexure.

I plan on making a Bahtinov mask for it tonight, and will probably try to figure out a way to attach a view finder tomorrow.

Now, if only the clouds will go away...

Monday, July 20, 2015

Baader Contrast Booster

This post is fairly long, so here are the pictures. I'll meet you on the other side!

Messier 8, the Lagoon Nebula; ST80 w/Baader CB on Vixen SP; Canon EOS Rebel T3; 11x120 @ ISO-3200

Messier 7, Ptolemy's Cluster; ST80 w/Baader CB on Vixen SP; Canon EOS Rebel T3; 32x60 @ ISO-3200

Back in February I purchased two new toys for my ST80/Vixen Super Polaris rig: a Baader Contrast Booster with IR-Cut filter, and an ADM dovetail saddle adapter. Family, clouds, weather, clouds, personal health, clouds, work, clouds and clouds prevented me from doing any astrophotography until mid-July.

The Vixen Super Polaris was the last mount of the Polaris line that was produced without a dovetail saddle. Personal budget limitations have prevented me from upgrading to a modern mount, but ADM Accessories makes an adapter within my price range. The VSAD-SP bolts to the top of the mount head. Two large, spring-loaded screws on the saddle grip the male dovetail bar very securely. Installing and removing the scope is very easy now. In addition, the telescope and camera can be properly balanced on the declination axis, which was impossible before because of the size of the scope and arrangement of the rings.

I'm always trying to find ways to get better images out of sub-par equipment. The ShortTube 80 is a great little scope for casual viewing, but the chromatic aberration inherent to fast achromats makes it unsuitable for imaging. A quality imaging scope is still outside of my price range for the foreseeable future, so I am trying to make the best with what I've got.

My research and experimentation led me to try the Baader Contrast Booster. The Contrast Booster filters out wavelengths on the extreme ends of the visible spectrum that are responsible for much of the blurring and halos caused by chromatic aberration. It also filters out wavelengths produced by common sources of light pollution.

I had the opportunity to try the filter visually against the Great Orion Nebula back in March. The moon was at 68% illumination and the nebula was about 30 degrees above the light-polluted horizon. Despite all of that, I could see a remarkable difference in contrast.

The two images above were made using the Baader Contrast Booster. The chromatic aberration, while not competely removed, was significantly reduced. This was a major improvement over my best results with the Orion SkyGlow Astrophotography Filter and the #15 yellow filter discussed in the Fixing Halos post.

The three following images illustrate the differences among the filters:

Baader Contrast Booster
Orion SkyGlow Astrophotography Filter
Yellow #15
The stars in the Contrast Booster image are larger, but that may be due to the fact that it was shot at ISO-3200 versus ISO-800 for the other two. The important thing to note is that the halos are confined to a tight ring around the stars.

The image of the Lagoon Nebula at the top of the post was processed without attempting to remove the effects of chromatic aberration. I applied the Color Layer technique to the image of Messier 7 to reduce an overall purple hue that was likely the result of all of those bright stars.

I was concerned that the Contrast Booster might cut out too much blue from the images. Pure blue hues are not common in astroimages. The best example that I can think of is Messier 20, the Trifid Nebula. This nebula presents a striking contrast between a red emission region and blue reflection region. The image of M20 below was compiled from only five subs, so it is fairly grainy. However, the blue came through the filter nicely:

Messier 20, the Trifid Nebula; ST80 w/Baader CB on Vixen SP; Canon EOS Rebel T3; 5x120 @ ISO-3200
I plan on doing more tests and reimaging more objects with the Baader Contrast Booster. So far, however, I think this filter brings the ST80 close to the performance of an ED refractor--at least as close as it can reasonably get.

Friday, January 30, 2015

Astrograph Maintenance

The SHSU observatory is the proud owner of a rare gem: a Takahashi Epsilon 200 astrograph. It is a fast (f/4) Newtonian telescope with a hyperbolic primary mirror and a dedicated field-flattener lens. It was designed specifically for astroimaging. Dr. Anjal Sharma, with the help of Mike Prokosch, Brian Neitfeld, myself, and others worked to restore the telescope and its mount to operational condition and to establish procedures for producing images. Anjal documented the restoration in Resurrecting an Old Classic. The Epsilon 200 has not been manufactured for about 20 years now, and according to Anjal there are probably only about three dozen of them in existence worldwide. Maintaining and using this exciting piece of equipment has been a pleasure and a privilege, and I hope that it will be of benefit to SHSU and its students in the future.

Anjal had to focus his energies elsewhere, and so left me more-or-less in charge of the scope and its care. However,I haven't been able to make trips to the observatory as frequently as I did before my youngest was born. As a result, the Epsilon 200 has not had much use, and it has not been maintained as well as it should. It's a great scope and is capable of capturing some beautiful images, so I'm slowly trying to bring it back up to a presentable and operational state. I reread Anjal's account of the restoration and a few Takahashi manuals (for similar scopes), and decided to tackle cleaning the mirror.

The mirror was a mess. Dirt, smoke, dust, mold, spiders, various other fauna and a strange green fibrous substance have slowly built up gunk on the mirror over the years. Below is a photo of the mirror in its cell. Note the cobwebs. There were several spots of mold and something else that I can only describe as a "biological byproduct." The mirror is held in place by six clips. In addition, six small compression washers hold the sides of the mirror down inside the cell. It's in there pretty snugly.


Here is the mirror removed from the cell. Working on this telescope has made me appreciate even more the quality of workmanship that Takahashi puts into their products. This is a serious telescope that was meant to be used for serious work.


I placed the mirror into a plastic tub filled with distilled water and dish soap. Distilled water should be used because tap water and bottled drinking water contain minerals that can leave deposits. After letting it soak for an hour, I very carefully cleaned the surface with cotton balls. (The trick with the cotton balls is to move them from the inside out and to not put any pressure other than their own weight on the mirror surface.)


After three passes with the cotton balls, I rinsed the mirror with more distilled water and let it air dry. Below is the result. There are a few specs of dust that landed while it was drying, and a few spots that did not come clean. These are optically insignificant.


I also cleaned dust and cobwebs out of the tube, collimated the scope, and realigned the finders and the guide scope. Here is the reassembled scope.


I wish I had remembered to bring a DSLR, but here is a photo of some birds sitting on a power line about a quarter of a mile away, taken afocally with my phone through one of the few eye pieces that will come to focus on this scope.


I'm not an expert on telescope mirrors, but this mirror looked practically brand new after its cleaning. I'm convinced that it will continue to serve up beautiful images for many more years.

There is still more work to do:  fine-tuning the collimation, cleaning up the mount, and cleaning out the shed. In addition, I am going to write up an operations manual for students and faculty who want to use the scope for research.


A follow-up report on the astrograph:

After reassembling everything, the scope sat for quite a while before I had the chance to go out and collimate it. I struggled and fought with the adjustment screws, but could never get it quite right. This was not unusual, though, as we've never gotten the mirrors aligned properly.

We took it to Land, Sea, & Sky, Takahashi's authorized distributor in the Americas, for alignment and further cleaning. Fred Garcia, the Tak expert, reported that the primary mirror was not installed correctly! Well, color me Takahashi yellow!  I'm guessing that the mirror was misaligned even before Anjal rebuilt the scope, because he marked the mirror position before cleaning it years ago. That would explain why we've NEVER been able to get it properly aligned.

As of this update (June 2016) I haven't had time to do any imaging on the Epsilon-200 since it was fixed. However, the university has been putting it to good use observing exoplanet transits!

Monday, January 19, 2015

Don't Panic!

Maybe Douglas Adams was on to something when he wrote "Don't Panic!" The mount is fixed!

I took the clutch assembly and RA motor dust cover apart and found that the gear on the RA motor had simply come loose. I reattached it and now it is working fine, assuming I got the gear spacing correct.

Sunday, January 18, 2015

Wandering Aimlessly Through the Stars

Bad news, at least for me. My Vixen Super Polaris mount has stopped working.

I was taking pictures of C/2014 Q2 Lovejoy the other night when the mount stopped tracking. I assumed that the batteries were dead, but the power light was still its normal brightness. It has always gotten dimmer when the batteries finally run out of juice.

I put in a fresh set of batteries and went out tonight to try imaging the comet, only to find that the clutch is apparently not engaging with the RA motor.

So, I guess I'll be out of the astrophotography gig for a while, except on the rare occasions that I can make it out to the observatory. I've been thinking about buying a new mount, anyway, but that may be much later than sooner. In the meantime I am going to take a stab at fixing this one. Wish me luck(y stars)!

Thursday, June 20, 2013

Lunar Experimentation

I usually avoid taking pictures of the Moon with my ST80 because the scope's short focal length does not provide much magnification. I began experimenting with an adapter to use eyepiece projection, but could not bring anything into focus. I eventually discovered that a 2X barlow lens works fine with the adapter. Here are images of the Moon taken on June 20, 2013:

Moon, June 20, 2013; Canon Rebel T3 (1100D), 2X Barlow, ST80 on Vixen SP mount; 11x1/40 sec at ISO -200

Closeup of Moon, June 20, 2013; Canon Rebel T3 (1100D), 2X Barlow, ST80 on Vixen SP mount; 11x1/40 sec at ISO -200

Monday, May 28, 2012

Practice Image

I had a little time this afternoon to practice solar imaging--probably my last attempt before the Venus Transit, next week.

Sunspot groups 1492 (left) and 1490 (right).

Here is my imaging setup. The Coronado PST is piggybacked onto the ST80. A solar filter on the ST80 allows me to take visible-light images of the Sun with a DSLR.


Saturday, February 19, 2011

NGC 2169 and Some New Toys

How many stars are in open cluster NGC 2169? Well, according to 14 of them, the answer is 37!

This small cluster of about 30 (probably not really 37) stars lies about 3,600 light years away in the constellation Orion and can be seen through a small telescope. The unusual arrangement of these stars is simply by chance, of course.

NGC 2169, ST80 on Vixen SP, 16x60
Groups of stars that form familiar patterns and shapes, like the "37" in NGC 2169, are called asterisms. Asterisms are not constellations. They may be composed of stars from one or more constellations. Other well-known asterisms include the Big Dipper, the Little Dipper, the Teapot, and the Coathanger.

I recently acquired an AccuFocus electronic focuser and an Orion SkyGlow Astrophotography Filter for my setup. This will make focusing much easier since I no longer have to touch the telescope to adjust it. The filter will come in handy by removing most of the light pollution "noise" that I get from the light domes of Huntsville and Houston.  The image above is the result of my first attempt at using the new equipment.

Tuesday, October 5, 2010

Vixen SP

OK, remember a few posts back when I said that I was borrowing a Vixen Great Polaris mount to use until I could make it back out to the observatory? Well, the guy who lent me the mount found a great deal on a Vixen Super Polaris mount. I bought it, and had my first imaging session with it this past Friday.

The Super Polaris is the predecessor to the Great Polaris. The main difference that I can see between the two is that the SP does not have a dovetail mounting plate built into it. That's OK, as I can probably get one for it later. Other than that it looks almost identical to and seems to have all of the same features as the GP.

So, here is the first image that I have finished processing from Friday night:

Andromeda Galaxy (Messier 31), Messier 32 (left of center) and Messier 110 (below and right of center)
This is, by far, my best image of the Andromeda Galaxy. I'm very pleased with this little mount! In addition to being a good astroimaging platform, it is small and very easy to transport. I'm hoping to take it with me on trips when I go to places that have really dark skies.

2010-10-06:  I modified the image to reduce star bloat and improve the color and brightness.

Sunday, August 1, 2010

Equipment

My first scopes were of the cheap department store variety.  When I started getting serious about the hobby, though, I invested in an Orion SkyQuest XT6 Classic Dobsonian.  It uses a parabolic primary mirror.  The aperture is 150mm (6 inches), and the focal length is 1200mm, which gives it an f/8.0 focal ratio.

Orion SkyQuest XT6 Classic Dobsonian
I use the XT6 primarily for visual observation, but I also use it for planetary imaging.

When my old Meade EQ60 equatorial mount broke, I purchased an Orion ShortTube 80 (ST80) Equatorial Refractor.  This little achromat is a nice wide-field telescope.  I sometimes use it for visual, but mostly use it for imaging.  The aperture is 80mm, and the focal length is 400mm.  That makes it an f/5.0, which is pretty fast.

Orion ST80 on EQ-1 Mount, DSLR mounted piggyback
Chromatic aberration can be an issue with brighter objects, but the objective lens dust cap has a smaller inset cap that allows the scope to be stopped down to about an f/9.0:

Dust cap with inset cap removed
The ST80 sits on an Orion EQ-1 equatorial mount.  This mount is fine for visual, but terrible for astroimaging. With patience and a lot of hard work, though, I can still get some decent images out of this setup.

Back in the early 1990s, Sam Houston State University purchased a Takahashi Epsilon-200 astrograph and NJP mount.  There are only about three dozen Epsilon-200s in the world, and less than a dozen in the United States!  Unfortunately, the person who purchased it left the university shortly thereafter, and no one knew what to do with the scope.  It sat, forgotten and used, for years.  During a Huntsville Amateur Astronomy Society (HAAS) meeting in 2006, Mike Prokosch showed the scope to Anjal Sharma, who recognized what a gem it was.  After about two years of work hunting down and replacing missing parts, cleaning everything, and upgrading the electronics, the Epsilon-200 was ready for action!  Anjal compiled a slideshow that details the rebuild.  It can be viewed here.

Anjal trained me on how to use the Epsilon-200, or as we like to call it, the Yellow Beauty.  I have had a blast using it, but have only scratched the surface of its potential.  I purchased a Canon EOS Rebel XS DLSR camera, which I attach to the scope using a T-ring adapter.  I have had some problems with the mount, though, but think that I have isolated the problem to the declination motor.  Hopefully we can get this problem fixed soon.

The Epsilon-200 has a 200mm aperture (8 inches) and an 800mm focal length.  That gives it an f/4.0 focal ratio.  The large aperture and fast focal ratio means that it can gather a lot of light very quickly, which is advantageous in astroimaging.  It has a hyperbolic primary mirror (hand ground by Takahashi mirror makers, as I understand) and utilizes a large field flattener lens.

Takahashi Epsilon-200 on NJP Mount