Saturday, December 16, 2017

Andromeda Galaxy

Messier 31, the Andromeda Galaxy
Click here for full size.

Exposure: 18x90+8x45+8x20+8x10@ISO1600
Telescope: AT72EDII
FF/Reducer:  ATR8 (f/4.8)
Mount: Vixen Super Polaris
Camera: Canon EOS Rebel T3
Processing: Deep Sky Stacker, Photoshop CS6

As I've noted before, sometimes imaging sessions don't work out as planned. Technical problems, the limitations of the equipment, and sometimes just plain incompetence cause problems that create useless or sub-par data.

I had one of those cases a few nights ago.

My intended target was Messier 31, the Andromeda Galaxy. It was a little east of zenith when I started. As usual, my imaging time was short. That, and the fact that I cannot perform a reliable meridian flip with my rig (and I don't have software that can fix the image rotation), led me to decide to attempt to point the scope for imaging on the western half of the sky.

The scope barely cleared the side of the mount.

My first test image had some star trailing, but I assumed that it was the normal periodic error. Alignment seemed to have gone well, so I had no reason to suspect any problems.

The next several images had star trailing, too. Maybe it's the balance in this position, I thought. No problem, I tested the balance when it's pointed further west, so it will eventually settle itself out.

But the images never improved.

Time was running out. I decided that the best way to salvage the session was to shorten the exposure time. That yielded enough usable subs to produce the image above.

Still, I think it is my best image of the Andromeda Galaxy, yet. Did I mention that I'm really impressed with this little scope?

Saturday, December 9, 2017

First Light - AT72EDII

Wow! This little scope is a major step up from the ST80.

There is a lot that I want to cover in this post, so bear with me, please. If you're just here for the pictures, then skip down a bit.

The AT72EDII is an air-spaced doublet refractor with an FPL-53 element. The lenses are made by Ohara. The FPL-53 lens makes a huge difference in correcting chromatic aberration, rendering sharper images with much more realistic colors--closer in hue to those that I have gotten from the Epsilon-200. In comparison, I thought the colors I was getting from the ST80 were somewhat "cartoonish," even with the Baader Contrast Booster.

Here is the rig as it was on the night of first light. Using a little of my redneck engineering skills, I cobbled together a viewfinder mount out of plywood and plastic.


A new telescope calls for a new focusing mask, right?  Using the astrojargon Bahtinov Focusing Mask Generator, I printed the mask on card stock, then mounted it to a cap made of more card stock, peel-and-stick foam, and duct tape. It fits over the end of the dew shield.

Yes, I used duct tape.
So, after getting everything put together, the mount aligned, and the focusing mask in place, I pointed the scope at Deneb to set the focus. There wasn't a lot of interest to see during the focusing process, but when I took a 30 second exposure with the mask still on, I got this:

Diffraction spikes on Deneb. Aside from being reduced in size, this is an unprocessed image.
Note the lack of spurious color as compared to these images from the ST80:


I knew that I was in for a treat! So, I took off the mask and made a single, 30-second exposure of Deneb:

Unprocessed, resized image.
Yes, there is a bit of a halo around Deneb, at center, but it is far less prominent (and less purple) than similar images that I've taken with the ST80.

I wanted to image the Double Cluster in Perseus, first, but it wasn't in a good position for the mount when I started. So, I decided to grab a few images of Messier 45, the Pleiades, until the Double Cluster was a little higher in the sky.

Messier 45, the Pleiades
Click here for full size

Exposure: 10x180@ISO1600
Telescope: AT72EDII
FF/Reducer:  ATR8 (f/4.8)
Mount: Vixen Super Polaris
Camera: Canon EOS Rebel T3
Processing: Deep Sky Stacker, Photoshop CS6

This is a close-up (full-size) of a portion of the nebula:

Click here for full size

I admit that, at a quick glance, there isn't a lot of difference between this image and what I think is my best image of the Pleiades made with the ST80. A close look, though, will reveal that the new image has more detail and better color balance. In addition, it took A LOT of processing work to make the older image look like that--there were a lot of problems that had to be dealt with. Frankly, I wouldn't have posted a close-up of the older image. It just didn't look this good at full size!

The Double Cluster finally got high enough to image, but the Moon was only about an hour away from rising. Working quickly, I settled on a relatively short exposure time. Very little processing was required for this image:

NGC 869 (left) and NGC 884
Click here for full size

Exposure: 20x90@ISO1600
Telescope: AT72EDII
FF/Reducer:  ATR8 (f/4.8)
Mount: Vixen Super Polaris
Camera: Canon EOS Rebel T3
Processing: Deep Sky Stacker, Photoshop CS6

Cluster NGC 869 contains an asterism that I call Perseus Man. Some call it The Cowboy.


Now, for the negatives.

The scope is difficult to balance on the declination axis on the Vixen Super Polaris. Judging by the subs that I got, this is probably not a big issue. After all, the mount only has a right ascension motor, and I'm not autoguiding.

The only troubling issue has to do with the ATR8 field flattener/focal reducer. It was advertised as providing "images that are sharply focused out to the very corners of a large format DSLR chip." Although much better than the ST80 (with no flattener), the images still have distorted stars out toward the edges, as seen in this full-size clip from the Deneb image, above:


I'm not certain of the cause. I wonder if I didn't install the T-ring correctly. It's also possible that the flattener doesn't perform quite as advertised. I will do some investigation and testing.

Other than that, I am very pleased with the results. With the winter constellations coming up, there are a lot of targets to image. So what's next? Sword of Orion? Horsehead and Flame? Monkey Head? M35? Dare I try the Flaming Star or the Christmas Tree? I think a return to the X Bar Ranch is in order.

Wednesday, December 6, 2017

The New Scope is Here!

That was amazingly fast! Free ground shipping via FedEx from Astronomics in Oklahoma, and the scope was outside my door in Texas the next day!

Below are some preview pics:


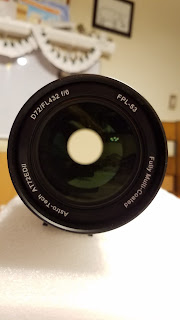
The scope features a metal dust cap (not shown) and machined tube rings attached to a dovetail bar. Note the nifty dust cover over the dual-speed focuser control.


The image above shows the ATR8 focal reducer/field flattener installed. The compression ring on the focuser tube holds it in place very nicely. My Canon T-ring adapter (not shown) attaches to the back of the ATR8 via an included adapter.


The anti-reflective coatings on the lenses appear to be doing their job. There is very little reflection visible compared to the ST80.

Overall, it's a very solid-feeling scope. The focuser is very smooth, and I didn't detect any flexure.

I plan on making a Bahtinov mask for it tonight, and will probably try to figure out a way to attach a view finder tomorrow.

Now, if only the clouds will go away...

Sunday, December 3, 2017

I Made a Decision

In the previous post I expressed my frustration with not finding time and energy for astronomy. Work and household chores have taken it out of me, but I have decided that I am going to make a greater effort to keep on going. It won't be easy, and I don't expect to be out there observing and imaging like I was during the Golden Age of 2009/2010.

Still, there is new incentive...

...on the way...

...in the mail...

...coming to my house.

Yes, I bought a new telescope! It's nothing fancy, but it is a full step up from my current primary imaging scope, the Orion ShortTube 80.

The new scope is an Astro-Tech AT72EDII. It has a 72mm aperture and 430mm focal length, which gives it a focal ratio of f/6 (slower than my ST80, which is f/5). The objective is an air-spaced doublet made with Ohara glass, with an FPL-53 lens to reduce false color (from chromatic aberration). It has a dual-speed rack-and-pinion focuser and a built-in camera angle adjuster.

I also ordered an Astro-Tech ATR8 focal reducer/field flattener. This reduces the focal ratio of the scope from f/6 to f/4.8. The field of view is also increased, which will be great for some of those large targets that I like to image.

Speaking of targets, I now have an excuse to re-image everything that I have imaged before! It's a case where everything old is new again. I am looking forward to this because now I can apply my new image processing skills to (hopefully) much-improved images.

The next big purchase will be a new mount. The Vixen Super Polaris is adequate for now. It produces good 3-minute subs consistently. Longer exposures tend to overexpose in my light polluted sky, so a CCD camera will be the next big item after the mount.

But these purchases are still a long way off. I have a great deal of difficulty buying things that don't have a practical purpose of some kind. It's not that I'm cheap, but there are tons of better things that the money can go toward. For example, I don't mind spending a good chunk of change on a good computer. But, on the other hand...I need a break. I need something fun to do. All work and no play is driving has driven me out of my mind. So, I'm going to make a better effort to do some fun stuff--and not just astronomy.

Anyway, the new scope will be here soon, and I've already lined up my first few targets!

Friday, November 24, 2017

Gamma Cass Nebula

Edit: I reprocessed the original image and replaced it. This one brings out the detail of the nebula a little better, and I did not desaturate the colors.

The bright star in this image is Gamma Cassiopeia, which is one of the stars that make up the "M" (or "W") shape of the constellation Cassiopeia. Located above and also to the right of the star are faint clouds that make up the Gamma Cass Nebula.

The nebula is visible due to ionization caused by ultraviolet radiation coming from Gamma Cassiopeia. The star and nebula, located about 4 or 5 light years away from each other, are around 550 light years away from us.


Exposure: 17x180@ISO3200
Telescope: Orion ShortTube 80
Mount: Vixen Super Polaris
Camera: Canon EOS Rebel T3
Filters: Baader Contrast Booster
Processing: Deep Sky Stacker, Photoshop CS6

It seems that I am losing the battle to find time and energy to go out and do anything astronomy-related. The weather has been very uncooperative, with the darkest nights being cloudy or hazy, and the clear nights sporting a bright moon. And, frankly, there is very little appeal to hauling out the equipment, setting up, and bringing it back in after only a couple of hours...usually followed by a workday or a weekend full of commitments.

I think I've pushed the limits of my primitive hardware about as far as it is possible to take it. Clearer, more detailed images will require a hefty investment in one or more new telescopes, imaging filters, a better mount, and a dedicated astrophotography camera. I cannot bring myself to commit money to upgrades if I cannot also guarantee that I will use them. Storage is an issue, too, and at this time I do not want to spend money on an observatory and/or storage shed.

Sunday, August 27, 2017

Solar Eclipse 2017 Animation

This is a rough animation compiled from individual frames that I took during the August 21, 2017 eclipse from Huntsville, Texas. The images were captured using a Mallincam SkyRaider AG monochrome camera mounted on a Coronado PST.  The images were processed in RegiStax 5.1 and Adobe Photoshop CS6.  The black and white images were colorized.

There is a sizable gap in the animation where I paused imaging while my neighbor's lawn was being mowed by the landscapers.  The mower kicked up a great deal of dust!

Activity around the sunspots and the rotation of the Sun are evident through the video.


Monday, August 21, 2017

Solar Eclipse 2017

The Big Day finally arrived!

I was out in the yard at 5:15 AM, accompanied by my very confused cats, to set up and polar align the Vixen Super Polaris mount.

My younger son stayed home from school to view the event (and play video games). The sky looked good. The equipment was ready. We went to the store to buy fresh batteries for the mount, then...

clouds

Yes, I wrote it. The "C" word. The bane of astronomers, both amateur and professional, everywhere.

I'd been looking forward to this day for years. In fact, I was already disappointed that I wouldn't be able to travel to see totality. But this...

This.

It's not unusual to have early morning clouds during humid, East Texas summers. But the timing...

But we amateur astronomers are an optimistic bunch. In fact, astronomy is one of the few things in which I embrace optimism to any degree. It's not in my personality to expect the best. However, I've been known to sit under overcast skies with the belief that, eventually, they will part and the skies will be clear. Sometimes I'm right. Too often, I'm wrong.

Still, I pushed forward and finished setting up the rig.

A couple of minutes after first contact (the point at which the Moon begins passing in front of the Sun), the clouds started to break up. I won't say that it was smooth sailing from that point forward, but as the day progressed the clouds became less of an issue.

The neighbor's landscaping crew, however, chose today to mow her lawn. Imaging had to be shut down temporarily to protect the equipment from dust.

I couldn't get the ST80 and PST to play nicely together, so I just concentrated on using the PST.

Most of the images made with the PST below are stacked images, meaning they are composed of several individual images that were digitally combined to improve detail and sharpness.

Anyway, I guess I've wasted enough of everyone's time talking about it. Let's get to the pictures!

First up, here is the rig in its final form, doing its job. I cobbled together a sun shield for the laptop out of a cardboard box. A laptop cooling pad and ventilation holes in the box kept the computer cool and comfortable.


I also made a simple pinhole projector camera. Here, my son is holding the paper while we look at the image.


A colander also makes a decent pinhole projector, with an interesting pattern:

This image was taken during the peak of the eclipse from my location.
This is one of the earliest images that I could obtain due to the clouds:


I never found a way to eliminate the Newton rings, or whatever the bands across the Sun are.

Incidentally, I'm using a different shade of yellow now--a little closer to the color of the Sun in my white light filter. (Since I'm using a monochrome camera, the original images are in black and white.)

In this image, sunspot group AR 2176 has been completely covered.


Nearing the peak! The Sun is smiling and has something stuck in its teeth.


This image is a composite between two exposures taken near the peak: a shorter exposure to get the detail on the Sun's disc, and a longer one to highlight the relatively dimmer prominences (the streams of plasma seen along the outside edges). The two images were combined in Photoshop. Each image is a single shot (not stacked).


This image was taken a little later, but composed of stacked images. Note the greater detail on the surface and in the prominences.


Here, the Moon is almost past the Sun. I somehow managed to accidentally switch the camera to a lower resolution, so this image is smaller than the others.

I like to call this one The Death Star.

Other than a small swarm of love bugs, there weren't as many visitors in the images as there were during the Venus Transit. However, a few vultures flew overhead near the end, and one got caught on camera:


It was a fun day, and I'm glad the weather held out enough to see the majority of the show. The next total solar eclipse in North America will happen in 2024. I can't wait!

Sunday, August 20, 2017

Another Sun Test

So, yesterday's test was a success, overall. Today I decided to try to address the banding and temperature issues.

The bands in the previous image are likely Newton's rings, based on what I have read. The Coronado PST reduces the light it receives down to a single wavelength (or pretty close to it). There is probably a misalignment somewhere in the optical train that is causing a reflection. The reflected light bounces around, and since light travels as a wave, the crests and troughs sometimes meet up--crest + crest, trough+trough, and crest+trough--amplifying or cancelling the light. The Wikipedia article probably explains it better.

Anyway...

I attempted to apply a flat field in the hope that it would reduce the effect. It did not work. I have run out of time, so the images tomorrow will just have to be wavy.

The temperature problem, however, may have been solved. I modified an old reflective windshield shade to fit over the scopes and cameras. The temperature inside the shield was almost 30 degrees less (96F) than direct sunlight (125F). The ambient temperature at the time was 96F.

I spend a great deal of time (and frustration) trying to mount the ST80 and PST together, like I did back during the Venus Transit. A problem that I had then, that I was attempting to solve this afternoon, was that the two scopes do not line up perfectly. The Sun will be visible in one, but either out of view or on the edge of view in the other. Unfortunately, despite a couple of frustrating hours working on it, I was unable to solve this problem.

My priority will be on the PST images, with a few white light images here and there.

Now, on to the pictures!

Here are the two scopes on the mount with their heat shield:

The Mallincam SkyRaider is on top, in its own custom heat shield sleeve.


It was getting late by the time I finished with everything else and started testing the rig. So, I only had time for a few shots before the Sun went behind a tree. Below is a composite image that combines the surface with some prominences that were visible on the solar limb. The original images were monochrome (black and white). I colorized them since, you know, the Sun is supposed to be yellow.

Sunspot region AR 2671, located near the center of the Sun's disc, looks a little like Santa's sleigh, doesn't it?

And, finally, here is a white light test image taken with the ST80:

Another sunspot group is coming around the limb on the left side of the image. I do not know what its number is at present.
Enjoy tomorrow's eclipse, and wish me luck!

Saturday, August 19, 2017

Sun Test

Below is an image of the Sun from a test run using the Mallincam SkyRaider on a Coronado PST. Even though this scope is not specifically designed for photography, it worked well with the SkyRaider.

I don't know what is causing the banding across the image, though...

I found out that the bands in the image are called Newton's rings, which are caused by interference patterns in monochromatic light. They are very common in narrow band imaging with these types of cameras. If I have time tomorrow I will experiment with some techniques I read about to eliminate or reduce them.


Here is a close-up (slightly enlarged) of AR 2671, the sunspot region visible near the center.


Saturday, July 15, 2017

International Space Station

If you are in the right place at the right time you might be able to catch a glimpse of the International Space Station (ISS) as it passes in front of the Sun or Moon. These types of events are called "transits" and are fairly uncommon.

Transits are hard to see and easy to miss. The ISS orbits between 205 and 255 miles above the surface of the Earth, and moves at over 17,000 miles per hour. At that distance and speed, lunar and solar transits only last about one second or less and are only visible from a relatively narrow strip of land on the Earth's surface.

But finding a good viewing spot and time is relatively easy with ISS Transit Finder. This site lets you specify an area and a date range, and will calculate when and where the ISS will pass in front of the Sun or Moon.

A solar transit occurred on July 14, 2017. The center of the centerline of the transit was located in Lake Raven in Huntsville State Park, which is not far from where I live. I set up the ShortTube 80 with a full-aperture glass solar filter along the shore of the lake, and caught the transit using the Mallincam SkyRaider camera. Here is a composite image of the transit:

International Space Station transit of the Sun, July 14, 2017. Sunspot group AR2665 is located on the right.

The frame rate of the camera was not consistent, which is why there are gaps in the image sequence. The original monochrome images have been colorized to approximate the view through the solar filter.

The following video shows the transit in fairly close to real-time. Note that there are TWO transits! The first is probably an insect that either flew in front of the telescope or crawled across the objective lens.


On a side note, one of the lessons that I learned from the Venus Transit was that good polar alignment is critical for good results. This is difficult to do in the daytime, though, unless the mount has some kind of "magic" hardware and software for figuring out its exact position. My '80s-tech Vixen Super Polaris EQ mount does not have any fancy alignment features, but I was able to get a decent polar alignment using my mobile phone.

I plan on trying to image more ISS transits in the future when the opportunities arise. I would really like to get a lunar transit now.

Sunday, July 2, 2017

Mallincam SkyRaider

I just acquired a (almost never) used monochrome Mallincam SkyRaider Autoguider. And since the skies magically cleared shortly after the previous owner and I made the exchange, we decided to hook it up to one of my scopes and try some lunar imaging.

The results, in my opinion, were fantastic!

Moon, July 1, 2017; Mallincam SkyRaider w/Baader Contrast Booster; ST80 on Vixen SP
Click here for full-size image
98 images were stacked in RegiStax 5.1, with wavelet sharpening applied. The sharpness and contrast are better than any other image of the moon that I've taken previously, I think.

The camera can also do long exposures, but the images are very noisy.  The included software has a "dark field" feature that removes a lot of the noise, but the number of hot pixels on the sensor make it impractical for imaging deep sky objects.  Here is a single frame of Messier 4, with a bonus airplane thrown in just for fun:

Messier 4; Mallincam SkyRaider w/Baader Contrast Booster; ST80 on Vixen SP. This is a single 2-minute exposure with a dark frame applied.
Next, I want to try solar imaging with the ST80 and the glass solar filter. If that works out well, then I plan on using that combo for imaging the August 21, 2017 solar eclipse.

Stay tuned!

Friday, February 3, 2017

I'm still alive

It's been a long time since I've made any kind of serious attempt at imaging. The weather has been horrible since...well, it seems like forever now. And even when it has been good I've not been able to get out with the telescope for one reason or another.

Well, the forces of nature, time, and fortune came together the other day and I dragged everything out to the ObservaRory and captured a few images.

My primary mission was to test some new software and a tablet for controlling the camera.

The goal was to see if it was practical to reduce the amount of equipment taken into the field. Overall it was a success.

First, the images:

Messier 45, the PleiadesST80 w/Baader CB on Vixen SP; Canon EOS Rebel T3; 15x180

Caldwell 49, the Rosette NebulaST80 w/Baader CB on Vixen SP; Canon EOS Rebel T3; 17x180
Now on to the technical details.

The tablet was a Samsung Galaxy Tab E, and the software was DSLR Controller. DSLR Controller is similar to Canon's EOS Utility in that it provides nearly total control over the camera. It is not as feature-rich as Backyard EOS (which is specifically designed for astroimaging), but it has the advantage of working on Android tablets and phones. DSLR Controller supports a wide variety of Canon cameras.

In short, I like the combination of the tablet and DSLR Controller. The software was easy to use once I got the hang of how to set up a time lapse session. Focusing and centering the targets was made much easier by being able to hold the tablet while adjusting the scope. Making adjustments while using the laptop has always been difficult for me because the laptop is mostly confined to sitting on a table.

Once I got the imaging sequences set up and running the whole process was fairly painless. However, the software did crash on me a few times while I was setting up. I have not yet been able to ascertain the cause.

The software also left the camera display on, despite the fact that I turned it off on the camera's control panel. Between that and the live view mode that DSLR Controller uses by default, the camera battery ran out much sooner than usual. When I get a chance I will see if there are options to turn these features off.

I wasn't able to take any darks or flats for the images above due to the battery issue. But other than that I'm mostly happy with the results. I'm glad to have finally gotten a chance to do some imaging again. Hopefully there will be more opportunities in the near future.